
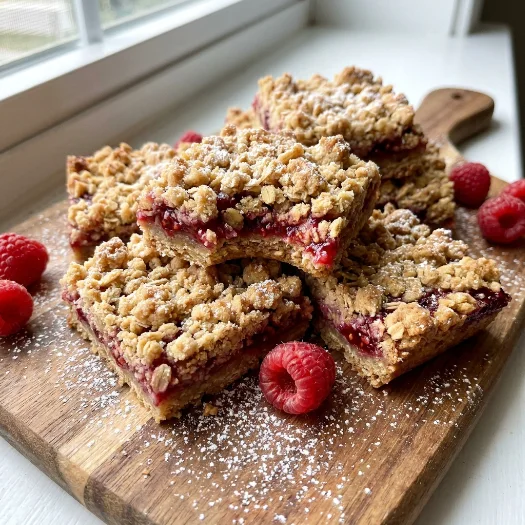
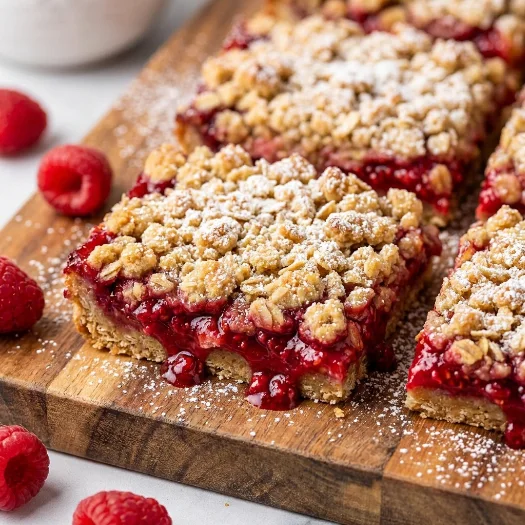
There’s something about raspberry crumble bars that lands right in the middle of dessert and snack. They’re soft, a little crumbly, and filled with a layer of fruit that brings just enough brightness. You can slice them neatly or scoop them a bit messier—it works either way.
The Story & Emotional Connection
A dessert that doesn’t need perfection
The first time I made raspberry crumble bars, I didn’t wait for them to fully set. I cut into the pan too early, and the filling was still soft, almost like a warm fruit crisp.
It didn’t look perfect, but it tasted exactly right. That’s when I realized this recipe doesn’t really need precision—it just needs a little patience, or not, depending on the moment.
Why this dish fits real life
These bars work for so many situations. You can make them ahead and slice them cleanly for later, or serve them warm when they’re still soft and a bit rustic.
They also stretch easily. One pan can feed a group or give you something sweet to reach for throughout the week.
What Makes This Recipe Work
A mix of textures that keeps things interesting
The base and topping come from the same crumble mixture, which keeps things simple. It bakes into a soft, slightly chewy layer on the bottom and a golden, crumbly topping on top.
In between, the raspberry filling turns thick and slightly tart, balancing out the sweetness from the crumble.
Why it feels dependable
Even though there are a few steps, none of them are complicated. You mix, press, layer, and bake.
The parchment paper makes it easy to lift everything out later, which helps when it’s time to slice.
Making the Recipe at Home
Ingredients
Raspberry Filling
- two 12-ounce bags of frozen raspberries
- 1/2 cup granulated sugar (more depending on tartness of your berries)
- 2 tablespoons flour
- 1 tablespoon cornstarch
- juice of one lemon
Crumble Layer
- 3 cups rolled oats
- 3 cups flour
- 2 cups brown sugar (loosely packed)
- 1 teaspoon baking powder
- 1 1/2 cups melted butter (salted works well)
- 1/2 teaspoon salt
Instructions
Preheat the oven to 350 degrees. Place raspberries in a large colander. Run warm water over them for about a minute, then let them drain for about an hour until softened and well drained. Once ready, mix the raspberries with sugar, flour, cornstarch, and lemon juice.
In a separate bowl, combine the oats, flour, brown sugar, baking powder, melted butter, and salt until the mixture forms a crumbly texture. Press two-thirds of this mixture into the bottom of a parchment-lined 9×13 pan. Bake for 10 minutes.
Spread the raspberry mixture evenly over the baked base. Sprinkle the remaining crumble mixture over the top. Return to the oven and bake for another 25–30 minutes.
Remove from the oven and let the bars cool. For clean slices, chill them for a few hours until firm. If you prefer, you can serve them sooner while they’re still soft. Lift them out of the pan using the parchment paper before cutting.
Practical tips that actually help
Letting the raspberries drain well makes a big difference. Too much liquid can make the bars overly soft.
Press the bottom layer firmly so it holds together once baked.
Common mistakes to avoid
Skipping the cooling time can make slicing tricky. The bars need time to set if you want clean edges.
Also, don’t rush the draining step for the raspberries. It helps the filling thicken properly.
Adapting the Recipe
Simple ways to change it up
If your raspberries are very tart, you can add a bit more sugar to the filling.
You can also mix in a handful of other berries for a slightly different flavor.
Making it work for different situations
Serve them chilled for a firmer, more structured bar.
Or serve them warm and soft when you want something closer to a fruit crumble you can scoop.
Serving & Enjoyment
These bars fit just about anywhere—afternoon snacks, casual desserts, or something to share.
They pair nicely with a cup of coffee or tea, or even a scoop of ice cream if you’re serving them warm.
Storage & Leftovers
Store the bars in an airtight container in the fridge. They hold together better once chilled and stay fresh for several days.
If you prefer them warm, you can gently reheat a portion before serving.
FAQ
Can I use fresh raspberries instead of frozen?
Yes, but frozen raspberries work well because they soften easily and release their juices during cooking.
Why do I need to drain the raspberries?
Draining removes excess moisture so the filling thickens instead of becoming too runny.
Can I freeze raspberry crumble bars?
Yes, once fully set, they freeze well. Just store them in a sealed container.
How do I get clean slices?
Chill the bars for a few hours before cutting. This helps them firm up and hold their shape.
Conclusion
Raspberry crumble bars don’t need to be perfect to be good. Whether you slice them neatly or scoop them a little warm and soft, they bring that mix of sweet, tart, and crumbly that keeps you coming back for another bite.
Sometimes that’s all you really need from a dessert.
Ingredients
Method
- Prep Raspberries: Preheat the oven to 350 degrees. Place raspberries in a large colander. Run warm water over them for a minute, and then let the liquid drain out for about an hour until softened and thoroughly drained (see notes). Mix raspberries with sugar, flour, cornstarch, and lemon juice.
- Soft Delicious Crust: Mix the oats, flour, sugar, baking powder, butter, and salt together into a crumble-like mixture. Press two thirds of the crumble into the bottom of a 9×13 pan lined with parchment paper. Bake for 10 minutes.
- Bake: Arrange the raspberry layer on top of the baked bottom layer. Sprinkle with remaining crumble. Bake for another 25-30 minutes.
- Finish: Remove from oven. They will need a little time to set up into “bar” formation, so chill them for a few hours to get them really solid. Orrrr… cut into it right away and eat it like a soft fruit crisp! You should be able to remove them from the pan easily by pulling up on the edges of the parchment paper.