
Three classic flavors in one cake always feel a little special. Chocolate, vanilla, and strawberry each bring their own personality, yet they sit comfortably together in the same slice. This vegan Neapolitan sheet cake captures that familiar trio in a soft, light sponge that looks just as lovely as it tastes.
A sheet cake also has its own quiet charm. It feels relaxed and unfussy, the kind of dessert you can cut into generous squares and place on a plate without worrying about perfect layers or delicate decoration. The marbled colors inside make each piece slightly different, which only adds to the appeal.
This recipe keeps everything plant-based while still delivering a tender crumb and smooth buttercream on top. The cake stays soft, the flavors stay balanced, and the whole process feels approachable for any home kitchen.
The Story Behind This Cake
A flavor combination many people grew up with
Neapolitan flavors tend to bring back memories. Ice cream tubs divided into chocolate, vanilla, and strawberry often appeared at family gatherings or birthday parties. Everyone had their favorite section, yet most people eventually scooped a little of each.
That mix of flavors carries a comforting sense of familiarity. Translating it into a cake feels natural, especially when the colors swirl together in the batter before baking.
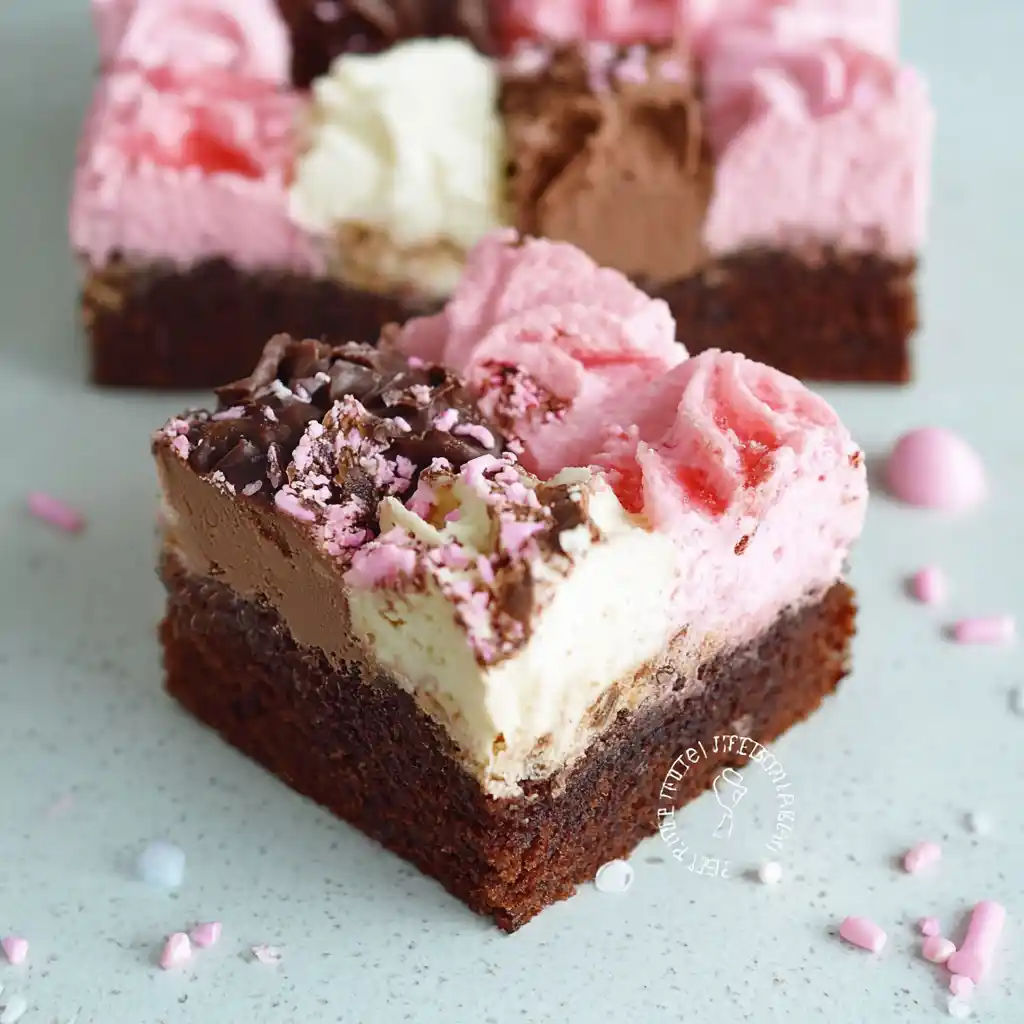
The moment the cake comes out of the oven and the marbled surface becomes visible, it already hints at the layers of flavor inside. Cutting into it later reveals soft streaks of cocoa, pale vanilla sponge, and a gentle pink strawberry section.
Why this cake fits everyday life
Not every cake needs to be tall or elaborate. Sometimes a simple square pan and a soft sponge are exactly what you want.
Sheet cakes are wonderfully practical. They bake evenly, slice neatly, and travel well if you plan to share them. They also allow the buttercream to spread across the surface in a relaxed way, letting the colors merge together without requiring careful piping skills.
This vegan version fits comfortably into everyday baking. The ingredients are straightforward, the method is manageable, and the result feels generous enough to serve a group.
What Makes This Recipe Work
The balance of three flavors
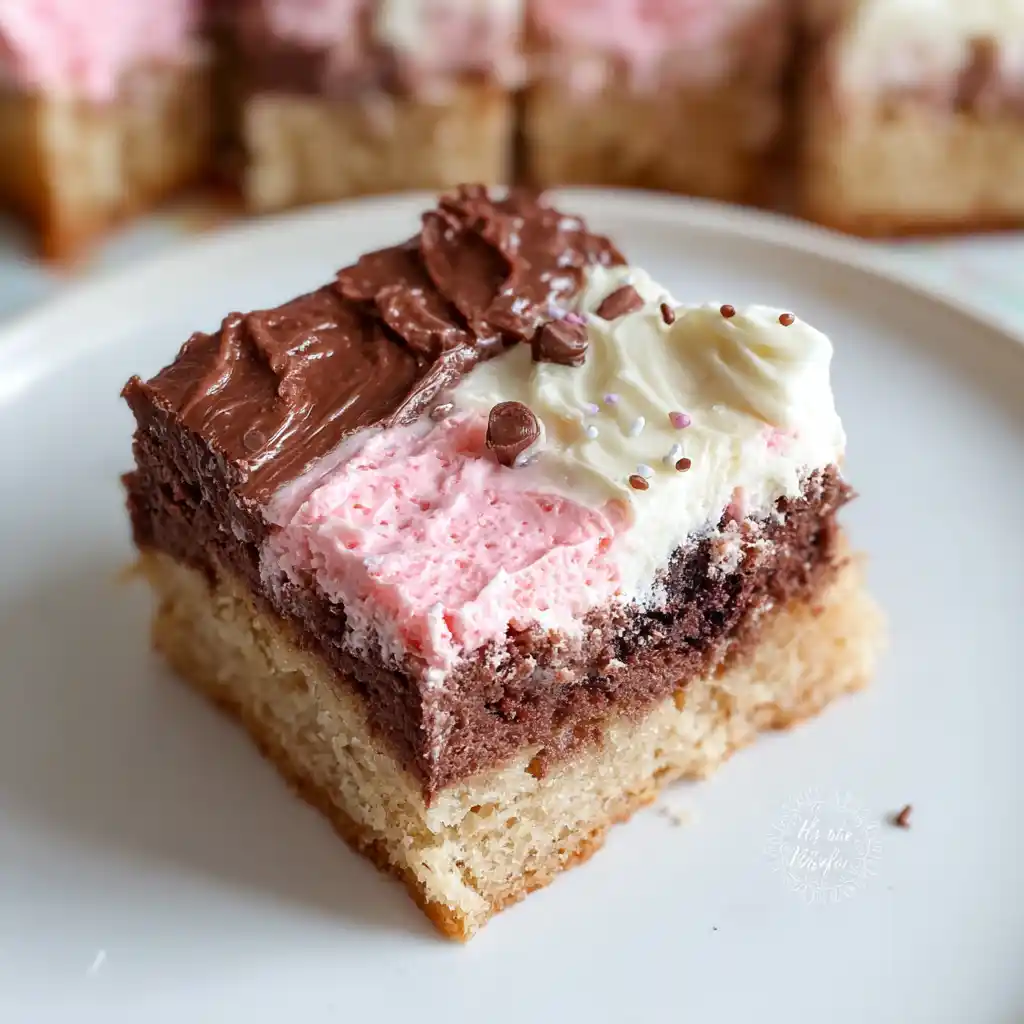
Chocolate adds depth and a gentle richness. Vanilla keeps the sponge mellow and familiar. Strawberry brings a light fruit note and a soft pink color that brightens the cake.
None of the flavors overpower the others. Instead, they sit side by side in the same slice. One bite may lean slightly chocolatey while the next highlights the strawberry swirl.
That little bit of variation keeps each piece interesting.
A dependable vegan sponge
A mixture of dairy-free milk and apple cider vinegar forms a plant-based version of buttermilk. This step gives the cake a tender crumb and helps it rise nicely in the oven.
Oil also plays an important role here. It keeps the sponge moist and light without needing eggs or dairy. Combined with self-raising flour and a touch of baking powder and bicarbonate of soda, the batter bakes into a soft cake that springs back gently when touched.
Because the batter divides into three bowls before flavoring, it is easy to create the classic Neapolitan colors without making separate cakes.
Making the Cake at Home
Ingredients for the cake
- 230ml of dairy-free milk
- 1 teaspoon of apple cider vinegar
- 100g of caster sugar
- 250g of self raising flour
- 1/2 teaspoon of baking powder
- 1/2 teaspoon of bicarbonate of soda
- 70ml of sunflower oil
- 1/2 teaspoon of vanilla extract
- 1 & 1/2 tablespoons of cocoa powder
- 1/2 teaspoon of strawberry flavouring
- A small drop of pink food gel
Ingredients for the buttercream
- 130g of dairy-free block butter
- 150g of icing sugar
- 1 tablespoon of dairy-free milk
- 40g of dairy-free dark chocolate
- 1/2 teaspoon of strawberry flavouring
- Pink food gel
Cake method
Start by heating the oven to 180ºC fan. Line an 8 x 8 inch square cake tin with grease-proof paper, letting a little of the paper hang over the edges so the cake lifts out easily later.
Pour the dairy-free milk into a bowl and add the apple cider vinegar. Whisk the mixture and leave it for about ten minutes. During this time it thickens slightly and acts like vegan buttermilk.
In a large mixing bowl, sift together the self raising flour, caster sugar, baking powder, and bicarbonate of soda. Stir them together so everything distributes evenly.
Add the sunflower oil and vanilla extract into the milk mixture and whisk again. Pour the wet ingredients into the bowl of dry ingredients and mix gently until the batter comes together.
Divide the batter evenly into three bowls.
Leave the first bowl plain for the vanilla portion. Stir the cocoa powder into the second bowl to create the chocolate batter. In the third bowl, mix in the strawberry flavouring and a small drop of pink food gel.
You will now have three different batters: vanilla, chocolate, and strawberry.
Spoon the batters into the prepared cake tin one color at a time. Once all three are in the pan, run a skewer lightly through the batter to swirl the colors together.
Place the tin in the center of the oven and bake for around 25–30 minutes. The cake is ready when a knife or skewer inserted into the center comes out clean and the surface springs back gently.
If the top begins to darken too quickly, lay a sheet of grease-proof paper loosely over the cake and continue baking.
Allow the cake to cool in the tin for about ten minutes. Carefully transfer it to a cooling rack and leave it to cool completely before adding the buttercream. Because the sponge is light, handle it gently when removing it from the tin.
Preparing the Buttercream
Add the dairy-free block butter to a large mixing bowl and whip it until creamy. A stand mixer with a balloon whisk works well, though a hand mixer does the job nicely too.
Sift the icing sugar into the bowl. Beat the mixture on high speed until the buttercream becomes light and smooth. Add the tablespoon of dairy-free milk to loosen the texture slightly.
Divide the buttercream into three bowls.
Leave one portion plain. Tint the second bowl with a small drop of pink food gel and stir in the strawberry flavouring. Melt the dairy-free dark chocolate and mix it into the third bowl.
Transfer each buttercream into its own piping bag. Pipe lines of each color across the surface of the cooled cake.
Using a palette knife, spread the buttercream gently so the colors blend slightly while still showing their individual shades. Avoid overmixing so the three tones remain visible.
A scattering of white sprinkles across the top adds a simple finishing touch.
Adapting the Recipe
Small changes that still work well
If strawberry flavouring is difficult to find, a little strawberry extract or a small amount of strawberry puree can provide a similar note. Just keep the quantity modest so the batter texture stays balanced.
Some bakers prefer a deeper chocolate flavor. Adding a tiny extra pinch of cocoa powder can give the chocolate portion a slightly stronger presence without changing the texture.
The buttercream colors can also shift depending on how much food gel you add. A pale pink gives a soft pastel look, while a slightly deeper shade creates stronger contrast with the chocolate frosting.
Adjusting for different occasions
This cake works nicely for casual gatherings, but it can also become a celebration cake with a few extra decorations. Fresh strawberries, chocolate curls, or colorful sprinkles on top can add a festive touch.
Cutting the cake into neat squares makes serving easy. Each piece naturally displays the marbled sponge and three buttercream shades.
Serving and Enjoying the Cake
Neapolitan sheet cake feels right at home on a dessert table or afternoon tea spread. The soft sponge and creamy topping pair nicely with coffee, tea, or a glass of plant-based milk.
Because the flavors are familiar and gentle, the cake appeals to a wide range of tastes. Chocolate lovers find their favorite note, while strawberry and vanilla keep the cake light and balanced.
It also slices easily, which makes it a pleasant choice for sharing at gatherings where people may want a small piece rather than a large layered slice.
Storage and Leftovers
Store the finished cake in a sealed container in the refrigerator. It keeps well for up to three days.
If you plan to frost the cake later, the unfrosted sponge can sit in a sealed container at room temperature for two days.
When chilled, the buttercream will firm slightly. Letting a slice sit at room temperature for a short time before serving helps the texture soften again.
Frequently Asked Questions
Can I make this cake a day in advance?
Yes. The sponge actually holds up very well overnight. Once it cools completely, place it in a sealed container. Frost it the next day when you are ready to serve.
Why do I mix dairy-free milk with vinegar?
The vinegar reacts with the plant-based milk and creates a mixture similar to buttermilk. This helps the cake develop a soft crumb and rise properly.
What kind of dairy-free butter works best?
Block-style vegan butter tends to work best for buttercream. It whips smoothly and holds its shape when spread across the cake.
Do I need gel food coloring?
Gel coloring works best because it adds color without thinning the batter or buttercream. A very small amount goes a long way.
Conclusion
A vegan Neapolitan sheet cake brings together three familiar flavors in one relaxed, comforting dessert. The soft sponge, gentle swirls of color, and creamy buttercream create a cake that feels cheerful without being complicated.
Each slice tells its own small story through chocolate streaks, vanilla sponge, and a hint of strawberry pink. That simple combination makes the cake easy to enjoy and easy to share.
Whether it appears at a gathering or quietly on the kitchen counter for an afternoon treat, this cake has a way of disappearing one square at a time.
Vegan Neapolitan Sheet Cake
Ingredients
Method
- Method (cake)
- Preheat your oven to 180ºC fan and line an 8 x 8 inch square cake tin with grease-proof paper. Allow the paper to hang over the tin slightly, this makes it easier to remove the cake when baked.
- In a bowl, combine the dairy-free milk with the apple cider vinegar and whisk until fully combined. Set aside for 10 minutes to curdle. This creates a vegan ‘buttermilk’.
- In a large mixing bowl, sift the flour, sugar, baking powder and bicarbonate of soda. Mix well to combine. Add the oil and vanilla extract into the ‘buttermilk’ and whisk to combine.
- Add the wet ingredients into the dry ingredients and mix just to combine.
- Divide the batter into 3 bowls. Leave one bowl plain white (this will be the vanilla cake), add 1& 1/2 tablespoons of cocoa powder to the second bowl and mix. Add the strawberry flavouring and a small drop of pink food gel to the third bowl. You will end up with three batters- chocolate, vanilla and strawberry.
- Spoon the batter into the lined tin, one colour at a time, then using a skewer, swirl the colours together.
- Pop the cake into the middle of the preheated oven and bake for around 25-30 minutes. You will know it is done when you put a knife or skewer down the middle of the cake and it comes out clean and it’s springy to the touch. If batter comes off on the skewer, it needs more time to bake. To prevent burning, top the cake with some grease proof paper then return back into the oven.
- Allow the cake to cool in the tin for 10 minutes then carefully transfer onto a cooling rack. Allow to cool fully before frosting. You can even place the cake in a sealed container once cool then frost the day after. It’s a very light sponge so be careful with it when removing from the tin.
- Method (buttercream)
- In a large mixing bowl, add in the dairy-free butter, whip until creamy. I use a stand mixer with a balloon whisk attachment, a hand mixer will work great too.
- Sift in the icing sugar. Whip on high speed for a couple of minutes to incorporate it. Add a splash of dairy-free milk to get it to a smooth consistency.
- Divide the buttercream into three bowls. Leave one bowl plain white. Colour the second bowl with a drop of pink food gel and strawberry flavouring.
- Melt the dark chocolate and mix it into the third bowl.
- Transfer the buttercream’s into separate piping bags and pipe lines of the buttercream onto the top of the cake (as seen in the video here).
- Using a pallet knife, carefully spread the buttercream out to merge the colours together. Don’t over mix.
- Why not decorate the cake with some white sprinkles.
Notes
- To store: Keep this cake stored in a sealed container in the fridge. Best eaten within 3 days of making. Un-iced cake can be stored in a sealed container at room temperature for 2 days.
- What dairy-free butter to use? My favourites are Naturli Vegan Block and Flora Plant Based Block Butter. Both work amazingly in vegan buttercream!